ziggle

Hail Hydra


  • Home

  • Archives

  • Search

Hello World

Posted on 2018-02-04

Welcome to Hexo! This is your very first post. Check documentation for more info. If you get any problems when using Hexo, you can find the answer in troubleshooting or you can ask me on GitHub.

Quick Start

Create a new post

1
$ hexo new "My New Post"

More info: Writing

Run server

1
$ hexo server

More info: Server

Generate static files

1
$ hexo generate

More info: Generating

Deploy to remote sites

1
$ hexo deploy

More info: Deployment

docker

Posted on 2018-01-25

Dockerfile关键字

关键字 含义
FROM base image
RUN 执行命令
ADD 添加文件
COPY 拷贝文件
CMD 执行命令
EXPOST 暴露端口
WORKDIR 指定路径
MAINTAINER 维护者
ENV 设定环境变量
ENTRYPOINT 容器入口
USER 指定用户
VOLUME mount point

命令行参数说明
|:——|——:|
|–detach|容器后台运行|
|–hostname|容器的 hostname|
|–publish|端口转发规则|
|–name|容器名称|
|–restart always|-|
|–volume|共享目录挂载|
|–e|配置运行时环境变量|
| –rm=false |指定容器停止后自动删除容器(不支持以docker run -d启动的容器)|
| –expose=[] |指定容器暴露的端口,即修改镜像的暴露端口|
| –dns=[] |指定容器的dns服务器|
| –dns-search=[] |指定容器的dns搜索域名,写入到容器的/etc/resolv.conf文件|
| –entrypoint=”” | 覆盖image的入口点|
| -m | 设置容器使用内存最大值 == –memory=””|
| –net=”bridge” | 指定容器的网络连接类型,支持 bridge/host/none/container: 四种类型;|

最简实例

1
2
3
4
5
6
7
8
FROM ubuntu
MAINTAINER z
RUN sed -i 's/archive.ubuntu.com/mirrors.ustc.edu.cn/g' /etc/apt/sources.list
RUN apt-get update
RUN apt-get install -y nginx
COPY index.html /var/www/html
ENTRYPOINT ["/usr/sbin/nginx","-g","deamon off;"]
EXPOSE 80
1
2
3
4
5
6
7
8
const port = 9999;
let http = require('http');
let server = http.createServer((req, res) => {
res.end("hail hydra\n");
})
server.listen(port,()=>{
console.log(`listen at ${port}`)
})
1
2
3
4
5
6
7
FROM  node
RUN mkdir -p /home/app
WORKDIR /home/app

COPY . /home/app
EXPOSE 9999
CMD ["node","./server.js"]
1
2
3
4
5
6
7
# build 
docker build -t appname .
# run
docker run -d -p 9999:9999 appname

# run container
docker start [container-id]
1
2
3
4
5
6
7
8
9
10
11
12
13
14
15
16
17
18
# docker run --detach \
# > --env GITLAB_OMNIBUS_CONFIG="gitlab_rails['lfs_enabled'] = true;" \
# > --publish 88:80 --publish 222:22 --publish 4433:443 \
# > --name gitlab \
# > --restart always \
# > --volume /root/home/gitlab/config:/etc/gitlab \
# > --volume /root/home/gitlab/logs:/var/log/gitlab \
# > --volume /root/home/gitlab/data:/var/opt/gitlab \
# > --name gitlab gitlab/gitlab-ce:latest
docker run --detach \
--hostname 192.168.192.186 \
--publish 4433:443 --publish 88:80 --publish 2222:22 \
--name gitlab \
--restart always \
--volume /root/home/gitlab/config:/etc/gitlab \
--volume /root/home/gitlab/logs:/var/log/gitlab \
--volume /root/home/gitlab/data:/var/opt/gitlab \
gitlab/gitlab-ce:latest
1
2
3
4
5
6
7
8
9
10
11
docker logs -f -t --since="2017-05-31" --tail=10 edu_web_1

--since : 此参数指定了输出日志开始日期,即只输出指定日期之后的日志。

-f : 查看实时日志

-t : 查看日志产生的日期

-tail=10 : 查看最后的10条日志。

edu_web_1 : 容器名称
Read more »

java-class

Posted on 2018-01-19

JVM类加载机制

加载 分配内存 初始化零值 设置对象头 执行<init>方法

  • 类加载检查 执行new指令时, 先去检查这个指令是否能在常量池中定位到这个类的符号引用,并且检查这个符号引用是否已经被加载,解析 初始化过, 如果没有就先执行

  • 验证:确保Class文件的字节流包含的信息是符合当前虚拟机的要求的

  • 分配内存,
  • 初始化零值 
  • 设置对象头 类的元数据信息引用, 对象hashcode ,GC分代,锁的级别

  • 执行<init>方法

注意以下几种情况不会执行类初始化:

  1. 通过子类引用父类的静态字段,只会触发父类的初始化,而不会触发子类的初始化。
  2. 定义对象数组,不会触发该类的初始化。
  3. 常量在编译期间会存入调用类的常量池中,本质上并没有直接引用定义常量的类,不会触
    发定义常量所在的类。
  4. 通过类名获取 Class 对象,不会触发类的初始化。
  5. 通过 Class.forName 加载指定类时,如果指定参数 initialize 为 false 时,也不会触发类初
    始化,其实这个参数是告诉虚拟机,是否要对类进行初始化。
  6. 通过 ClassLoader 默认的 loadClass 方法,也不会触发初始化动作。

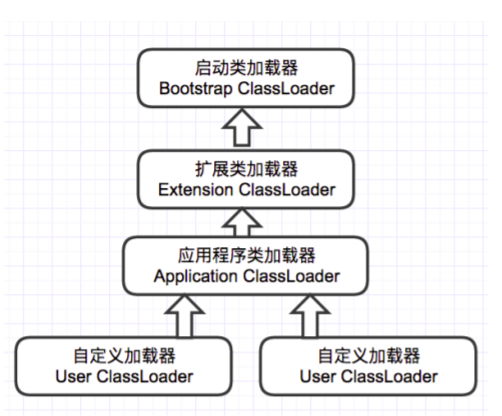
类加载器的分类

#### 

加载:java虚拟机在加载类的过程中为静态变量分配内存。
类变量:static变量在内存中只有一个,存放在方法区,属于类变量,被所有实例所共享
销毁:类被卸载时,静态变量被销毁,并释放内存空间。static变量的生命周期取决于类的生命周期
类初始化顺序:

静态变量、静态代码块初始化
构造函数
自定义构造函数
结论:想要用static存一个变量,使得下次程序运行时还能使用上次的值是不可行的。因为静态变量生命周期虽然长(就是类的生命周期),但是当程序执行完,也就是该类的所有对象都已经被回收,或者加载类的ClassLoader已经被回收,那么该类就会从jvm的方法区卸载,即生命期终止。

更进一步来说,static变量终究是存在jvm的内存中的,jvm下次重新运行时,肯定会清空里边上次运行的内容,包括方法区、常量区的内容。

要实现某些变量在程序多次运行时都可以读取,那么必须要将变量存下来,即存到本地文件中。常用的数据存取格式:XML、JSON、Propertities类(类似map的键值对)等

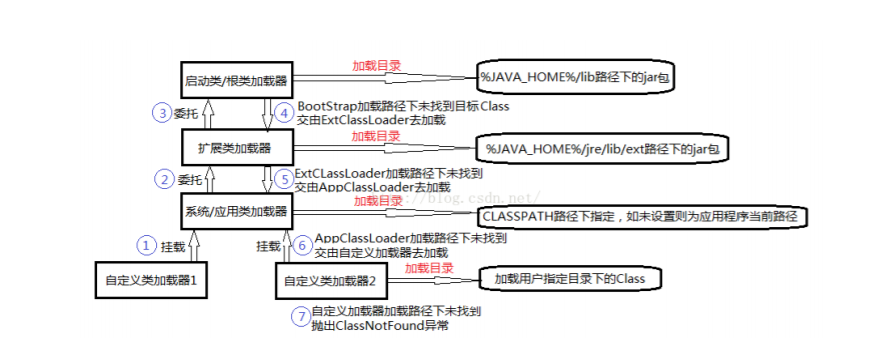
##### 双亲委派加载机制

碰到一个类需要加载时,它们之间是如何协调工作的,即java是如何区分一个类该由哪个类加载器来完成呢。 在这里java采用了委托模型机制,这个机制简单来讲,就是“类装载器有载入类的需求时,会先请示其Parent使用其搜索路径帮忙载入,如果Parent 找不到,那么才由自己依照自己的搜索路径搜索类”

1
2
3
4
5
6
7
8
9
10
11
12
13
14
15
16
17
18
19
20
21
22
23
24
25
public class Test{

public static void main(String[] arg){

ClassLoader c = Test.class.getClassLoader(); //获取Test类的类加载器

System.out.println(c);

ClassLoader c1 = c.getParent(); //获取c这个类加载器的父类加载器

System.out.println(c1);

ClassLoader c2 = c1.getParent();//获取c1这个类加载器的父类加载器

System.out.println(c2);

}

}

/**
sun.misc.Launcher$AppClassLoader@73d16e93
sun.misc.Launcher$ExtClassLoader@15db9742
null
*/
成员变量 局部变量 静态变量
定义位置 在类中,方法外 方法中,或者方法的形式参数 在类中,方法外
初始化值 有默认初始化值 无,先定义,赋值后才能使用 有默认初始化值
调用方式 对象调用 —– 对象调用,类名调用
存储位置 堆中 栈中 方法区
生命周期 与对象共存亡 与方法共存亡 与类共存亡
别名 实例变量 —— 类变量

枚举实现的单例类

1
2
3
4
5
6
7
8
9
10
11
12
13
14
public enum Singleton{
Instance;
private String name;
Singleton(){
this.name="name";
}
public static Singleton getInstance(){
return Instance;
}

public String getName(){
return this.name;
}
}

csharp

Posted on 2018-01-15
1
2
3
4
5
6
7
8
9
10
11
12
13
14
15
16
17
18
19
20
21
22
23
24
25
26
27
28
29
30
31
32
33
34
35
36
37
38
39
40
41
42
43
44
45
46
47
48
49
50
/// <summary>  
/// 实体类序列化成xml
/// </summary>
/// <param name="enitities">实体.</param>
/// <param name="headtag">节点名称 (实体类名)</param>
/// <returns></returns>
public static string ObjListToXml<T>(List<T> enitities, string headtag)
{
StringBuilder sb = new StringBuilder();
PropertyInfo[] propinfos = null;
//sb.AppendLine("<?xml version=\"1.0\" encoding=\"utf-8\"?>");
sb.AppendLine("<" + headtag + ">");
foreach (T obj in enitities)
{
//初始化propertyinfo
if (propinfos == null)
{
Type objtype = obj.GetType();
if (objtype != typeof(string) && objtype != typeof(int))
{
propinfos = objtype.GetProperties();
}
}
sb.AppendLine("<item>");
if (propinfos != null)
{
foreach (PropertyInfo propinfo in propinfos)
{
var value = propinfo.GetValue(obj, null);
sb.Append("<");
sb.Append(propinfo.Name);
sb.Append(">");
sb.Append(value ?? "");
sb.Append("</");
sb.Append(propinfo.Name);
sb.AppendLine(">");
}
}
else
{
var value = obj;
sb.Append("<i>");
sb.Append(value);
sb.Append("</i>");
}
sb.AppendLine("</item>");
}
sb.AppendLine("</" + headtag + ">");
return sb.ToString();
}

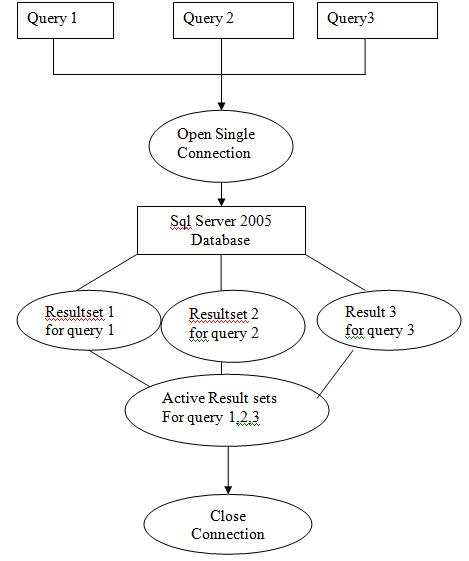
Multiple Active Result Sets (MARS)

多个活动结果集 (MARS) 是一项用于 SQL Server 的功能,可用来对单个连接执行多个批处理。 如果对 SQL Server 启用了 MARS,使用的每个命令对象将向该连接添加一个会话。

1
2
3
string connectionString = "Data Source=MSSQL1;" +
"Initial Catalog=AdventureWorks;Integrated Security=SSPI;" +
"MultipleActiveResultSets=True";

maven

Posted on 2018-01-15

pom模板文件

1
2
3
4
5
6
7
8
9
10
11
12
13
14
15
16
17
18
19
20
21
22
23
24
25
26
27
28
29
30
<?xml version="1.0"?>

<project xmlns="http://maven.apache.org/POM/4.0.0" xmlns:xsi="http://www.w3.org/2001/XMLSchema-instance" xsi:schemaLocation="http://maven.apache.org/POM/4.0.0 http://maven.apache.org/xsd/maven-4.0.0.xsd">
<!-- 模型版本。maven2.0必须是这样写,现在是maven2唯一支持的版本 -->
<modelVersion>4.0.0</modelVersion>
<!-- 公司或者组织的唯一标志,并且配置时生成的路径也是由此生成, 如com.winner.trade,maven会将该项目打成的jar包放本地路径:/com/winner/trade -->
<groupId>temp.download</groupId>
<!-- 本项目的唯一ID,一个groupId下面可能多个项目,就是靠artifactId来区分的 -->
<artifactId>temp-download</artifactId>
<version>1.0-SNAPSHOT</version>
<!-- 打包的机制,如pom,jar, maven-plugin, ejb, war, ear, rar, par,默认为jar -->
<packaging>jar</packaging>
<dependencies>
<!-- 需要下载什么jar包 添加相应依赖 其余部分无需在意-->
<dependency>
<groupId>org.apache.httpcomponents</groupId>
<artifactId>httpcore</artifactId>
<version>4.3.1</version>
<!-- 设置指依赖是否可选,默认为false,即子项目默认都继承:为true,则子项目必需显示的引入,与dependencyManagement里定义的依赖类似 -->
<optional></optional>
</dependency>
</dependencies>

<!-- 为pom定义一些常量,在pom中的其它地方可以直接引用 使用方式 如下 :${file.encoding} -->
<properties>
<file.encoding>UTF-8</file.encoding>
<java.source.version>1.5</java.source.version>
<java.target.version>1.5</java.target.version>
</properties>
</project>

构建配置

1
2
3
4
5
6
7
8
9
10
11
12
13
14
15
16
17
18
19
20
21
22
23
24
25
26
27
28
29
30
31
32
33
34
35
36
37
38
39
40
41
42
43
44
45
46
47
48
49
50
51
52
53
54
55
56
57
58
59
60
61
62
63
64
65
66
67
68
69
70
71
72
73
74
75
76
77
78
79
80
81
82
83
84
85
86
87
88
89
90
91
92
93
94
95
96
97
98
99
100
101
102
103
104
105
106
107
108
109
110
111
112
113
114
115
116
117
118
119
120
121
122
123
124
125
126
127
128
129
130
131
132
133
134
135
136
137
138
139
140
141
142
143
144
145
146
147
148
149
150
151
<build>

<!-- 产生的构件的文件名,默认值是${artifactId}-${version}。 -->
<finalName>myPorjectName</finalName>

<!-- 构建产生的所有文件存放的目录,默认为${basedir}/target,即项目根目录下的target -->
<directory>${basedir}/target</directory>

<!--当项目没有规定目标(Maven2叫做阶段(phase))时的默认值, -->
<!--必须跟命令行上的参数相同例如jar:jar,或者与某个阶段(phase)相同例如install、compile等 -->
<defaultGoal>install</defaultGoal>

<!--当filtering开关打开时,使用到的过滤器属性文件列表。 -->
<!--项目配置信息中诸如${spring.version}之类的占位符会被属性文件中的实际值替换掉 -->
<filters>
<filter>../filter.properties</filter>
</filters>

<!--项目相关的所有资源路径列表,例如和项目相关的配置文件、属性文件,这些资源被包含在最终的打包文件里。 -->
<resources>
<resource>

<!--描述了资源的目标路径。该路径相对target/classes目录(例如${project.build.outputDirectory})。 -->
<!--举个例子,如果你想资源在特定的包里(org.apache.maven.messages),你就必须该元素设置为org/apache/maven/messages。 -->
<!--然而,如果你只是想把资源放到源码目录结构里,就不需要该配置。 -->
<targetPath>resources</targetPath>

<!--是否使用参数值代替参数名。参数值取自properties元素或者文件里配置的属性,文件在filters元素里列出。 -->
<filtering>true</filtering>

<!--描述存放资源的目录,该路径相对POM路径 -->
<directory>src/main/resources</directory>

<!--包含的模式列表 -->
<includes>
<include>**/*.properties</include>
<include>**/*.xml</include>
</includes>

<!--排除的模式列表 如果<include>与<exclude>划定的范围存在冲突,以<exclude>为准 -->
<excludes>
<exclude>jdbc.properties</exclude>
</excludes>

</resource>
</resources>

<!--单元测试相关的所有资源路径,配制方法与resources类似 -->
<testResources>
<testResource>
<targetPath />
<filtering />
<directory />
<includes />
<excludes />
</testResource>
</testResources>

<!--项目源码目录,当构建项目的时候,构建系统会编译目录里的源码。该路径是相对于pom.xml的相对路径。 -->
<sourceDirectory>${basedir}\src\main\java</sourceDirectory>

<!--项目脚本源码目录,该目录和源码目录不同, <!-- 绝大多数情况下,该目录下的内容会被拷贝到输出目录(因为脚本是被解释的,而不是被编译的)。 -->
<scriptSourceDirectory>${basedir}\src\main\scripts
</scriptSourceDirectory>

<!--项目单元测试使用的源码目录,当测试项目的时候,构建系统会编译目录里的源码。该路径是相对于pom.xml的相对路径。 -->
<testSourceDirectory>${basedir}\src\test\java</testSourceDirectory>

<!--被编译过的应用程序class文件存放的目录。 -->
<outputDirectory>${basedir}\target\classes</outputDirectory>

<!--被编译过的测试class文件存放的目录。 -->
<testOutputDirectory>${basedir}\target\test-classes
</testOutputDirectory>

<!--项目的一系列构建扩展,它们是一系列build过程中要使用的产品,会包含在running bulid‘s classpath里面。 -->
<!--他们可以开启extensions,也可以通过提供条件来激活plugins。 -->
<!--简单来讲,extensions是在build过程被激活的产品 -->
<extensions>

<!--例如,通常情况下,程序开发完成后部署到线上Linux服务器,可能需要经历打包、 -->
<!--将包文件传到服务器、SSH连上服务器、敲命令启动程序等一系列繁琐的步骤。 -->
<!--实际上这些步骤都可以通过Maven的一个插件 wagon-maven-plugin 来自动完成 -->
<!--下面的扩展插件wagon-ssh用于通过SSH的方式连接远程服务器, -->
<!--类似的还有支持ftp方式的wagon-ftp插件 -->
<extension>
<groupId>org.apache.maven.wagon</groupId>
<artifactId>wagon-ssh</artifactId>
<version>2.8</version>
</extension>

</extensions>

<!--使用的插件列表 。 -->
<plugins>
<plugin>
<groupId></groupId>
<artifactId>maven-assembly-plugin</artifactId>
<version>2.5.5</version>

<!--在构建生命周期中执行一组目标的配置。每个目标可能有不同的配置。 -->
<executions>
<execution>

<!--执行目标的标识符,用于标识构建过程中的目标,或者匹配继承过程中需要合并的执行目标 -->
<id>assembly</id>

<!--绑定了目标的构建生命周期阶段,如果省略,目标会被绑定到源数据里配置的默认阶段 -->
<phase>package</phase>

<!--配置的执行目标 -->
<goals>
<goal>single</goal>
</goals>

<!--配置是否被传播到子POM -->
<inherited>false</inherited>

</execution>
</executions>

<!--作为DOM对象的配置,配置项因插件而异 -->
<configuration>
<finalName>${finalName}</finalName>
<appendAssemblyId>false</appendAssemblyId>
<descriptor>assembly.xml</descriptor>
</configuration>

<!--是否从该插件下载Maven扩展(例如打包和类型处理器), -->
<!--由于性能原因,只有在真需要下载时,该元素才被设置成true。 -->
<extensions>false</extensions>

<!--项目引入插件所需要的额外依赖 -->
<dependencies>
<dependency>...</dependency>
</dependencies>

<!--任何配置是否被传播到子项目 -->
<inherited>true</inherited>

</plugin>
</plugins>

<!--主要定义插件的共同元素、扩展元素集合,类似于dependencyManagement, -->
<!--所有继承于此项目的子项目都能使用。该插件配置项直到被引用时才会被解析或绑定到生命周期。 -->
<!--给定插件的任何本地配置都会覆盖这里的配置 -->
<pluginManagement>
<plugins>...</plugins>
</pluginManagement>

</build>

使用mvn 生成模板项目

1
2
ziggle@ziggle MINGW64 /e/code/mvnjava
$ mvn archetype:generate -DgroupId=com.zigglle -DartifactId=mymvn
Read more »
1…171819…22
ziggle

ziggle

Hail Hydra !

110 posts
45 tags
RSS
GitHub
© 2021 ziggle
Powered by Hexo
|
Hail Hydra—