ziggle

Hail Hydra


  • Home

  • Archives

  • Search

how-to-create-spring-boot-starter

Posted on 2019-01-21

创建spring.factories

resources/META-INF/spring.factories

1
2
org.springframework.boot.autoconfigure.EnableAutoConfiguration=\
com.oucloud.web.starter.ZiggleWebAutoConfigure

自动配置入口

1
2
3
4
5
6
@Configuration
@ConditionalOnClass(EnableStarterConfig.class)
@EnableConfigurationProperties({ZiggleStatProperties.class})
@Import({JacksonConfiguration.class, SecurityConfiguration.class})
public class ZiggleWebAutoConfigure {
}
  • @Import 导入配置类
  • 有EnableStartConfig.class 条件导入

自动配置注解

1
2
3
4
5
6
7
8
9
10
11
@Target(ElementType.TYPE)
@Retention(RetentionPolicy.RUNTIME)
@Documented
@Inherited
@EnableWebSecurity
@AutoConfigureBefore(SecurityAutoConfiguration.class)
@EnableGlobalMethodSecurity(prePostEnabled = true)
@AutoConfigurationPackage
@Import({ZiggleConfigurationSelector.class})
public @interface EnableStarterConfig {
}
  • 使用这个注解后会启用EnableWebSecurity
  • 最重要的是 @Import({ZiggleConfigurationSelector.class}) 导入配置类

配置类selector

1
2
3
4
5
6
7
8
public class ZiggleConfigurationSelector implements ImportSelector {
@Override
public String[] selectImports(AnnotationMetadata importingClassMetadata) {
return new String[]{
JacksonConfiguration.class.getName(),
SecurityConfiguration.class.getName()};
}
}

具体配置类

1
2
3
4
5
6
7
8
9
10
11
12
13
14
15
16
17
18
19
20
21
22
23
24
25
26
27
28
29
30
31
32
33
34
35
36
37
38
39
40
41
42
43
44
45
46
47
48
49
50
51
52
53
54
55
56
57
58
59
public class SecurityConfiguration {

private static final String[] AUTH_WHITE_LIST = {
// -- swagger ui
"/swagger-resources/**",
"/v2/api-docs",
"/swagger-ui.html",
"/**/*.css",
"/**/*.js",
"/**/*.png",
"/**/*.jpg",
"/webjars/**",
"/druid/**"
};

@Bean
@ConditionalOnClass(EnableWebSecurity.class)
public WebSecurityConfigurerAdapter webSecurityConfigurerAdapter(AuthenticationProvider authenticationProvider,
ZiggleStatProperties statProperties,
IJwtTokenDecoder decoder
) {

return new WebSecurityConfigurerAdapter() {

@Bean(BeanIds.AUTHENTICATION_MANAGER)
@Override
public AuthenticationManager authenticationManagerBean() throws Exception {
return super.authenticationManagerBean();
}

@Override
protected void configure(AuthenticationManagerBuilder auth) throws Exception {
//自定义身份验证组件
auth.authenticationProvider(authenticationProvider);
super.configure(auth);
}

@Override
protected void configure(HttpSecurity http) throws Exception {
http
.cors()
.and().csrf().disable()
.sessionManagement()
.sessionCreationPolicy(SessionCreationPolicy.STATELESS)
.and()
.authorizeRequests()
.antMatchers(HttpMethod.POST, statProperties.getRoutingPrefixV1() + "/login").permitAll()
.antMatchers(HttpMethod.POST, statProperties.getRoutingPrefixV1() + "/user/").permitAll()
.antMatchers(AUTH_WHITE_LIST).permitAll()
.anyRequest().authenticated()
.and()
.addFilterBefore(new JwtExceptionHandlerFilter(), ChannelProcessingFilter.class)
.addFilterBefore(new JwtAuthenticationFilter(authenticationManager(), decoder), UsernamePasswordAuthenticationFilter.class)
;
}
};
}

}

sqlserver

Posted on 2018-12-14

coursor 使用

1
2
3
4
5
6
7
8
9
10
11
12
13
14
15
16
17
18
19
20
21
22
23
24
25
26
27
28
29
30

PRINT OBJECT_ID('[dbo].[PROC_checkPlan]');

DECLARE @name VARCHAR(50) -- database name
DECLARE @path VARCHAR(256) -- path for backup files
DECLARE @fileName VARCHAR(256) -- filename for backup
DECLARE @fileDate VARCHAR(20) -- used for file name

SET @path = 'C:\sqlbackup\'

SELECT @fileDate = CONVERT(VARCHAR(20),GETDATE(),112)

DECLARE db_cursor CURSOR FOR
SELECT name
FROM MASTER.dbo.sysdatabases
WHERE name NOT IN ('master','model','msdb','tempdb','backup')

OPEN db_cursor
FETCH NEXT FROM db_cursor INTO @name

WHILE @@FETCH_STATUS = 0
BEGIN
SET @fileName = @path + @name + '_' + @fileDate + '.BAK'
BACKUP DATABASE @name TO DISK = @fileName

FETCH NEXT FROM db_cursor INTO @name
END

CLOSE db_cursor
DEALLOCATE db_cursor

sqlserver 添加执行权限到用户

/ CREATE A NEW ROLE /
CREATE ROLE db_executor

/ GRANT EXECUTE TO THE ROLE /
GRANT EXECUTE TO db_executor

修改表结构 / 添加默认值

1
2
3
4
5
6
7
8
9
update data_terminal set message_center_password = '' where message_center_password is null 

alter table data_terminal
alter column [message_center_password] varchar(255) not null


ALTER TABLE data_terminal
ADD CONSTRAINT default_terminal
DEFAULT '' FOR [message_center_password];

Deleting all duplicate rows but keeping one

1
2
3
4
5
6
WITH cte AS (
SELECT[foo], [bar],
row_number() OVER(PARTITION BY foo, bar ORDER BY baz) AS [rn]
FROM TABLE
)
DELETE cte WHERE [rn] > 1

查看sqlserver 索引碎片情况

1
2
3
4
5
6
7
8
9
10
SELECT OBJECT_NAME(ind.OBJECT_ID) AS TableName, 
ind.name AS IndexName, indexstats.index_type_desc AS IndexType,
indexstats.avg_fragmentation_in_percent ,
'alter index ' + ind.name + ' on ' + OBJECT_NAME(ind.OBJECT_ID)+ ' rebuild' as sql
FROM sys.dm_db_index_physical_stats(DB_ID(), NULL, NULL, NULL, NULL) indexstats
INNER JOIN sys.indexes ind
ON ind.object_id = indexstats.object_id
AND ind.index_id = indexstats.index_id
WHERE indexstats.avg_fragmentation_in_percent > 50
ORDER BY indexstats.avg_fragmentation_in_percent DESC

重建索引的方法3

1
ALTER INDEX [idx_name] ON [dbo].[table_name] REBUILD

dbcc

DBCC(database console commands)
如果表的当前标识值小于列中存储的最大标识值,则使用标识列中的最大值对其进行重置。

1
DBCC CHECKIDENT('[dbo].[data_module]', NORESEED)

重置identity种子

1
2
3
4
5
6
7
8
9
10
11
12
13
14
15
16
17
create table #table_temp (item varchar(111))
insert into #table_temp (item)
select name from sysobjects where type = 'u'
declare @count int
select @count= count(1) from #table_temp
declare @i varchar(111)
while @count>0
begin
select @count= count(1) from #table_temp
select top(1)@i= item from #table_temp
DBCC CHECKIDENT( @i, RESEED)
-- DBCC CHECKIDENT ( table_name, RESEED, new_reseed_value )
-- DBCC CHECKIDENT ( table_name, RESEED )
-- DBCC CHECKIDENT ( table_name, NORESEED)

delete from #table_temp where item = @i
end
Read more »

jvm

Posted on 2018-12-12

JVM 内存模型

内存模型

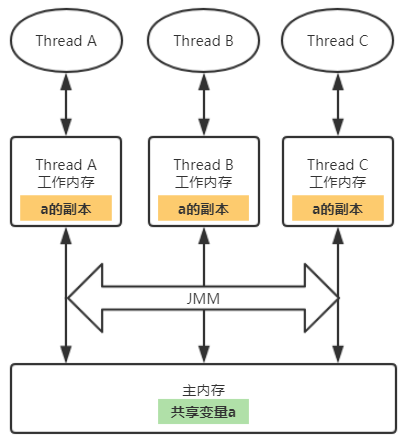
多个线程同时对同一个共享变量进行读写的时候会产生线程安全问题。那为什么CPU不直接操作内存,而要在CPU和内存间加上各种缓存和寄存器等缓冲区呢?因为CPU的运算速度要比内存的读写速度快得多,如果CPU直接操作内存的话势必会花费很长时间等待数据到来,所以缓存的出现主要是为了解决CPU运算速度与内存读写速度不匹配的矛盾。

内存间交互协议

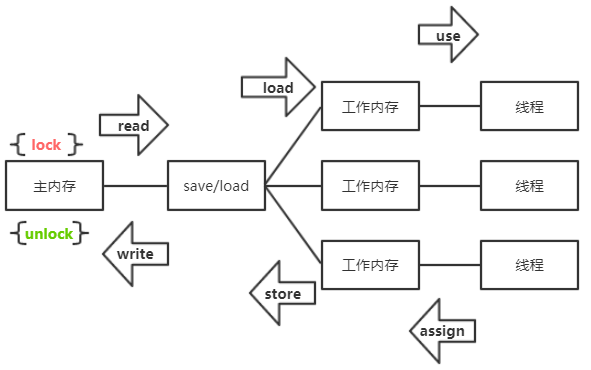
JMM规定了主内存和工作内存间具体的交互协议,即一个变量如何从主内存拷贝到工作内存、如何从工作内存同步到主内存之间的实现细节,这主要包含了下面8个步骤:

  • lock(锁定):作用于主内存的变量,把一个变量标识为一条线程独占状态。
  • unlock(解锁):作用于主内存变量,把一个处于锁定状态的变量释放出来,释放后的变量才可以被其他线程锁定。
  • read(读取):作用于主内存变量,把一个变量值从主内存传输到线程的工作内存中,以便随后的load动作使用
  • load(载入):作用于工作内存的变量,它把read操作从主内存中得到的变量值放入工作内存的变量副本中。
  • use(使用):作用于工作内存的变量,把工作内存中的一个变量值传递给执行引擎,每当虚拟机遇到一个需要使用变量的值的字节码指令时将会执行这个操作。
  • assign(赋值):作用于工作内存的变量,它把一个从执行引擎接收到的值赋值给工作内存的变量,每当虚拟机遇到一个给变量赋值的字节码指令时执行这个操作。
  • store(存储):作用于工作内存的变量,把工作内存中的一个变量的值传送到主内存中,以便随后的write的操作。
  • write(写入):作用于主内存的变量,它把store操作从工作内存中一个变量的值传送到主内存的变量中。

这8个步骤必须符合下述规则:

  • 不允许read和load,store和write操作之一单独出现。
  • 不允许一个线程丢弃它最近的assign操作。即变量在工作内存中改变了账号必须把变化同步回主内存
  • 一个新的变量只允许在主内存中诞生,不允许工作内存直接使用未初始化的变量。
  • 一个变量同一时刻只允许一条线程进行lock操作,但同一线程可以lock多次,lock多次之后必须执行同样次数的unlock操作
  • 如果对一个变量进行lock操作,那么将会清空工作内存中此变量的值。
  • 不允许对未lock的变量进行unlock操作,也不允许unlock一个被其它线程lock的变量
  • 如果一个变量执行unlock操作,必须先把此变量同步回主内存中。

指令重排

在执行程序时,为了提高性能,编译器和处理器常常会对指令做重排序。从Java源代码到最终实际执行的指令序列,会分别经历下面3种重排序:

  • 编译器优化的重排序。编译器在不改变单线程程序语义的前提下,可以重新安排语句的执行顺序。
  • 指令级并行的重排序。现代处理器采用了指令级并行技术(Instruction-LevelParallelism,ILP)来将多条指令重叠执行。如果不存在数据依赖性,处理器可以改变语句对应机器指令的执行顺序。
  • 内存系统的重排序。由于处理器使用缓存和读/写缓冲区,这使得加载和存储操作看上去可能是在乱序执行。

如果两个操作访问同一个变量,其中一个为写操作,此时这两个操作之间存在数据依赖性。 编译器和处理器不会改变存在数据依赖性关系的两个操作的执行顺序,即不会重排序。不管怎么重排序,单线程下的执行结果不能被改变,编译器、runtime和处理器都必须遵守as-if-serial语义。

内存屏障

通过插入内存屏障(Memory Barrier)可以阻止特定类型的指令重排。JMM将内存屏障划分为四种:
| :——- | ——- |——–: |
|屏障类型| 示例| 描述|
|LoadLoad Barriers | Load1-LoadLoad-Load2 |Load1数据装载过程要先于Load2及所有后续的数据装载过程|
|StoreStore Barriers | Store1-StoreStore-Store2| Store1刷新数据到内存的过程要先于Strore2及后续所有刷新数据到内存的过程|
|LoadStore Barriers |Load1-LoadStore-Store2| Load1数据装载要先于Strore2及后续所有刷新数据到内存的过程|
|StoreLoad Barriers |Store1-StoreLoad-Load2 |Store1刷新数据到内存的过程要先于Load2及所有后续的数据装载过程|
Java中volatile关键字的实现就是通过内存屏障来完成的。

内存回收

Eden 内存分配

为了方便垃圾回收 ,jvm 将对内存分为新生代,老生带
新生代分为 Eden ,from Survivor, to Survivor 区

其中Eden 和Survivor 区比例默认是 8:1:1 ,参数调整配置 -XX:SurvivorRatio=8
当在Eden区分配内存不足时,会发生minorGC 由于多数对象生命周期很短,minorGC发生频繁

当发生minorGC 时jvm 会根据复制算法 将存活的对象拷贝到另一个未使用的Survivor区如果Survovor 区内存不足
会使用分配担保策略将对象移动到老年代

谈到minorGC 相对的fullGC(majorGC) 是指发生在老年代的GC,不论是效率还是速度都比minorGC慢得多
回收时会发生stop the world 是程序发生停顿

jvm config

https://docs.oracle.com/cd/E40972_01/doc.70/e40973/cnf_jvmgc.htm#autoId2

1
-server -Xms24G -Xmx24G -XX:PermSize=512m -XX:+UseG1GC -XX:MaxGCPauseMillis=200 -XX:ParallelGCThreads=20 -XX:ConcGCThreads=5 -XX:InitiatingHeapOccupancyPercent=70

javac

  • 词法分析
  • 语法分析
  • 语义分析
  • 字节码生成器

    从源代码找出规范化的token流
    判断是否复合Java语言规范 形成抽象语法树
    将复杂语法转换为简单语法 语法糖处理
    生成字节码

jvm 运行时数据区域

方法区
虚拟机栈
本地方法栈
程序计数器 – 没有oom
堆

运行时常量区是方法区的一部分存放编译时生成的字面量和符号引用

对象的创建

  • 虚拟机遇到一条new指令时,首先将去检查这个指令的参数是否能在常量池中定位到一 个类的符号引用,并且检查这个符号引用代表的类是否已被加载、解析和初始化过。如果没 有,那必须先执行相应的类加载过程

对象的内存布局

  • 示例数据
  • 对齐填充
  • 对象头 虚拟机要对对象进行必要的设置,例如这个对象是哪个类的实例、如何才能找 到类的元数据信息、对象的哈希码、对象的GC分代年龄等信息。这些信息存放在对象的对 象头(Object Header)之中。根据虚拟机当前的运行状态的不同,如是否启用偏向锁等,对 象头会有不同的设置方式

对象的访问定位

引用

  • java 1.2 如果reference类型的数据中存储的数值代表的是另外一块内存的起始地址,就称这块 内存代表着一个引用

回收方法区

  • 判断是否是一个无用的类
    • 所有类的实例都已经被回收 , java堆中不存在类的任何实例
    • 加载该类的ClassLoader已经被回收
    • 该类对应的java.lang.Class对象没有在任何地方被引用,无法在任何地方通过反射访问该 类的方法

CMS 收集器

  • 初始标记(CMS initial mark) - Stop The World
  • 并发标记(CMS concurrent mark) -
  • 重新标记(CMS remark) - Stop The World
  • 并发清除(CMS concurrent sweep) -

G1

  • 初始标记(Initial Marking)
  • 并发标记(Concurrent Marking)
  • 最终标记(Final Marking)
  • 筛选回收(Live Data Counting and Evacuation)

内存分配与回收策略

对象主要分配在新生代的Eden区上 ,少数情况下也可能会直接分配在老年代中 其细节取决于当前使用的是哪一种垃圾收集器组合,还有虚拟 机中与内存相关的参数的设置

  • 对象优先在Eden分配 当Eden区没有足够空间进行分配时,虚拟 机将发起一次Minor GC

systemd

Posted on 2018-12-06

Created symlink /etc/systemd/system/redis.service → /lib/systemd/system/redis-server.service

the environment file

1
2
3
4
5
6
7
APP_ROOT=/srv/app/api
BINARY="api.jar"
PORT="1998"
USER="user"
JAVA_OPTS="-Xmx128m"
CONFIG_SERVER="-Dspring.cloud.config.uri=http://api:10000"
LOGGING="-Dlogging.config=/etc/logback-spring.xml -Dlogging.path=/opt/chuck/chuck-api/logs"

the systemd unit file

1
2
3
4
5
6
7
8
9
10
11
12
13
14
15
16
17

[Unit]
Description=chuck-api
After=syslog.target

[Service]
EnvironmentFile=-/etc/default/chuck-api
WorkingDirectory=/opt/chuck/chuck-api/current
User=chuck
ExecStart=/usr/bin/java -Duser.timezone=UTC $LOGGING $CONFIG_SERVER $JAVA_OPTS -Dserver.port=${PORT} -jar $BINARY
StandardOutput=journal
StandardError=journal
SyslogIdentifier=chuck-api
SuccessExitStatus=143

[Install]
WantedBy=multi-user.target

其中:

- `WorkingDirectory` : app运行目录
- `SyslogIdentifier` : syslog 前缀
- `SuccessExitStatus` : JVM 成功退出码 `143` 
- `WorkingDirectory` and `User` 不能用环境变量

systemd fd limit

系统

  • ulimit -n num

systemd

  • fd 默认4096

*.server

1
2
3
4
[Service]
LimitCORE=infinity
LimitNOFILE=100000
LimitNPROC=100000

spring

Posted on 2018-11-21

spring 实现拦截的五种姿势

使用 Filter 接口

Filter 接口由 J2EE 定义,在Servlet执行之前由容器进行调用。
而SpringBoot中声明 Filter 又有两种方式:

  1. 注册 FilterRegistrationBean
    声明一个FilterRegistrationBean 实例,对Filter 做一系列定义,如下:
    1
    2
    3
    4
    5
    6
    7
    8
    9
    10
    11
    12
    13
    14
    15
    16
    17
    @Bean
    public FilterRegistrationBean customerFilter() {
    FilterRegistrationBean registration = new FilterRegistrationBean();

    // 设置过滤器
    registration.setFilter(new CustomerFilter());

    // 拦截路由规则
    registration.addUrlPatterns("/intercept/*");

    // 设置初始化参数
    registration.addInitParameter("name", "customFilter");

    registration.setName("CustomerFilter");
    registration.setOrder(1);
    return registration;
    }

其中 CustomerFilter 实现了Filter接口,如下:

1
2
3
4
5
6
7
8
9
10
11
12
13
14
15
16
17
18
19

public class CustomerFilter implements Filter {

private static final Logger logger = LoggerFactory.getLogger(CustomerFilter.class);
private String name;

@Override
public void init(FilterConfig filterConfig) throws ServletException {
name = filterConfig.getInitParameter("name");
}

@Override
public void doFilter(ServletRequest request, ServletResponse response, FilterChain chain)
throws IOException, ServletException {
logger.info("Filter {} handle before", name);
chain.doFilter(request, response);
logger.info("Filter {} handle after", name);
}
}
  1. @WebFilter 注解
    为Filter的实现类添加 @WebFilter注解,由SpringBoot 框架扫描后注入

@WebFilter的启用需要配合@ServletComponentScan才能生效

1
2
3
4
5
6
7
8
9
10
11
12
13
14
15
16
17
18
19
20
@Component
@ServletComponentScan
@WebFilter(urlPatterns = "/intercept/*", filterName = "annotateFilter")
public class AnnotateFilter implements Filter {

private static final Logger logger = LoggerFactory.getLogger(AnnotateFilter.class);
private final String name = "annotateFilter";

@Override
public void init(FilterConfig filterConfig) throws ServletException {
}

@Override
public void doFilter(ServletRequest request, ServletResponse response, FilterChain chain)
throws IOException, ServletException {
logger.info("Filter {} handle before", name);
chain.doFilter(request, response);
logger.info("Filter {} handle after", name);
}
}

使用注解是最简单的,但其缺点是仍然无法支持 order属性(用于控制Filter的排序)。
而通常的@Order注解只能用于定义Bean的加载顺序,却真正无法控制Filter排序。
这是一个已知问题,参考这里

Read more »
1…121314…22
ziggle

ziggle

Hail Hydra !

110 posts
45 tags
RSS
GitHub
© 2021 ziggle
Powered by Hexo
|
Hail Hydra—